 Isn't this stunning? One of my friends made this beautiful birthday card just for me!! The stamp set she used is called Four Frames. Here is link to her blog. Hop on over and take a look. She has a list of all of the supplies she used. Thank you, Monika. I love it!! http://paperchrome.blogspot.com/
Saturday, December 31, 2011
Picture Frame Calendar

Friday, December 30, 2011
Northern Frost Glass Block

This time I tried embossing on the glass but it didn't work. So I used the Northern Frost die, my Big Shot, and some glossy cardstock. Picking out those tiny little pieces took some time but after that all I did was use some SNAIL to adhere them, added some rhinestones on and around the flakes, added some mica flakes inside, and tied a marina mist striped ribbon around it. I tried lights inside but you couldn't see the snowflakes when the lights were on. The mica chips are perfect!This really is beautiful. Very peaceful, too.
Decor Elements Glass Block

Fashionable Hearts Picture


I must say that Christmas snuck up on me yet once again. I am going to make up for not posting much in December. This is my first creation with the new hearts embossing folder in the mini available starting Jan. 4th called Fashionable Hearts. It is just like my favorite butterfly folder called Beautiful Wings. The folder cuts and embosses all at the same time. The hearts have dots, stripes, houndstooth, and other raised patterns on them. So cute and only $11.95! You will also need your Big Shot, some rhinestones, cardstock scraps (I used subtles and brights), and some striped ribbon (I used melon mambo). I found the picture frame in my closet while I was decluttering. It is 12x15. It came with a mat, I used some white striped designer paper from the neutrals pack to back it. It took me about 4 hours from beginning to end. Cutting out the hearts takes minutes. Laying them on takes hours. I tried to stick with the color order of the rainbow, ROYGBIV. I used SNAIL to adhere them. The rhinestones are added randomly. I love my Big Shot. The new accessories that will be available Jan. 4th for it are wonderful. I hope you saved some Christmas money!
Friday, December 16, 2011
Hello, Doily

We will be making this card this weekend at the stamping class. Come and play with us!
Tuesday, December 13, 2011
Glass Ornament

This is so beautiful!! I used a glass ornament with a flat front and attached a snowflake I cut out from the Northern frost die and my Big Shot. The silver glimmer paper is gorgeous! I punched little 1/4 inch circles out of the leftover glimmer paper from the snowflake and attached them all around. Inside are some micha chips from the current mini. I tied ribbons around the top, one satin and one organdy. The trick to this was NOT to use glue. It slid all around. I actually used SNAIL to attach the glimmer pieces. I added a small rhinestone to the middle of the snowflake. It does take a bit of time to pop out the pieces of the snowflake but it is worth it.
Come on over this weekend and make one. Class times are Saturday at 1:00 and Sunday at 2:00. RSVP so I can have a kit ready for you.
Sunday, December 11, 2011
Junior Mints and Brownies
This is an easy treat and sooooo good! Make your favorite brownies, melts some junior mints on top (about 3 minutes in the oven), spread, and eat! You could sprinkle crushed candy canes on them, too.


Saturday, November 26, 2011
Tiny Teacup

Saturday, November 19, 2011
Aviary

Love and Sympathy

Friday, November 11, 2011
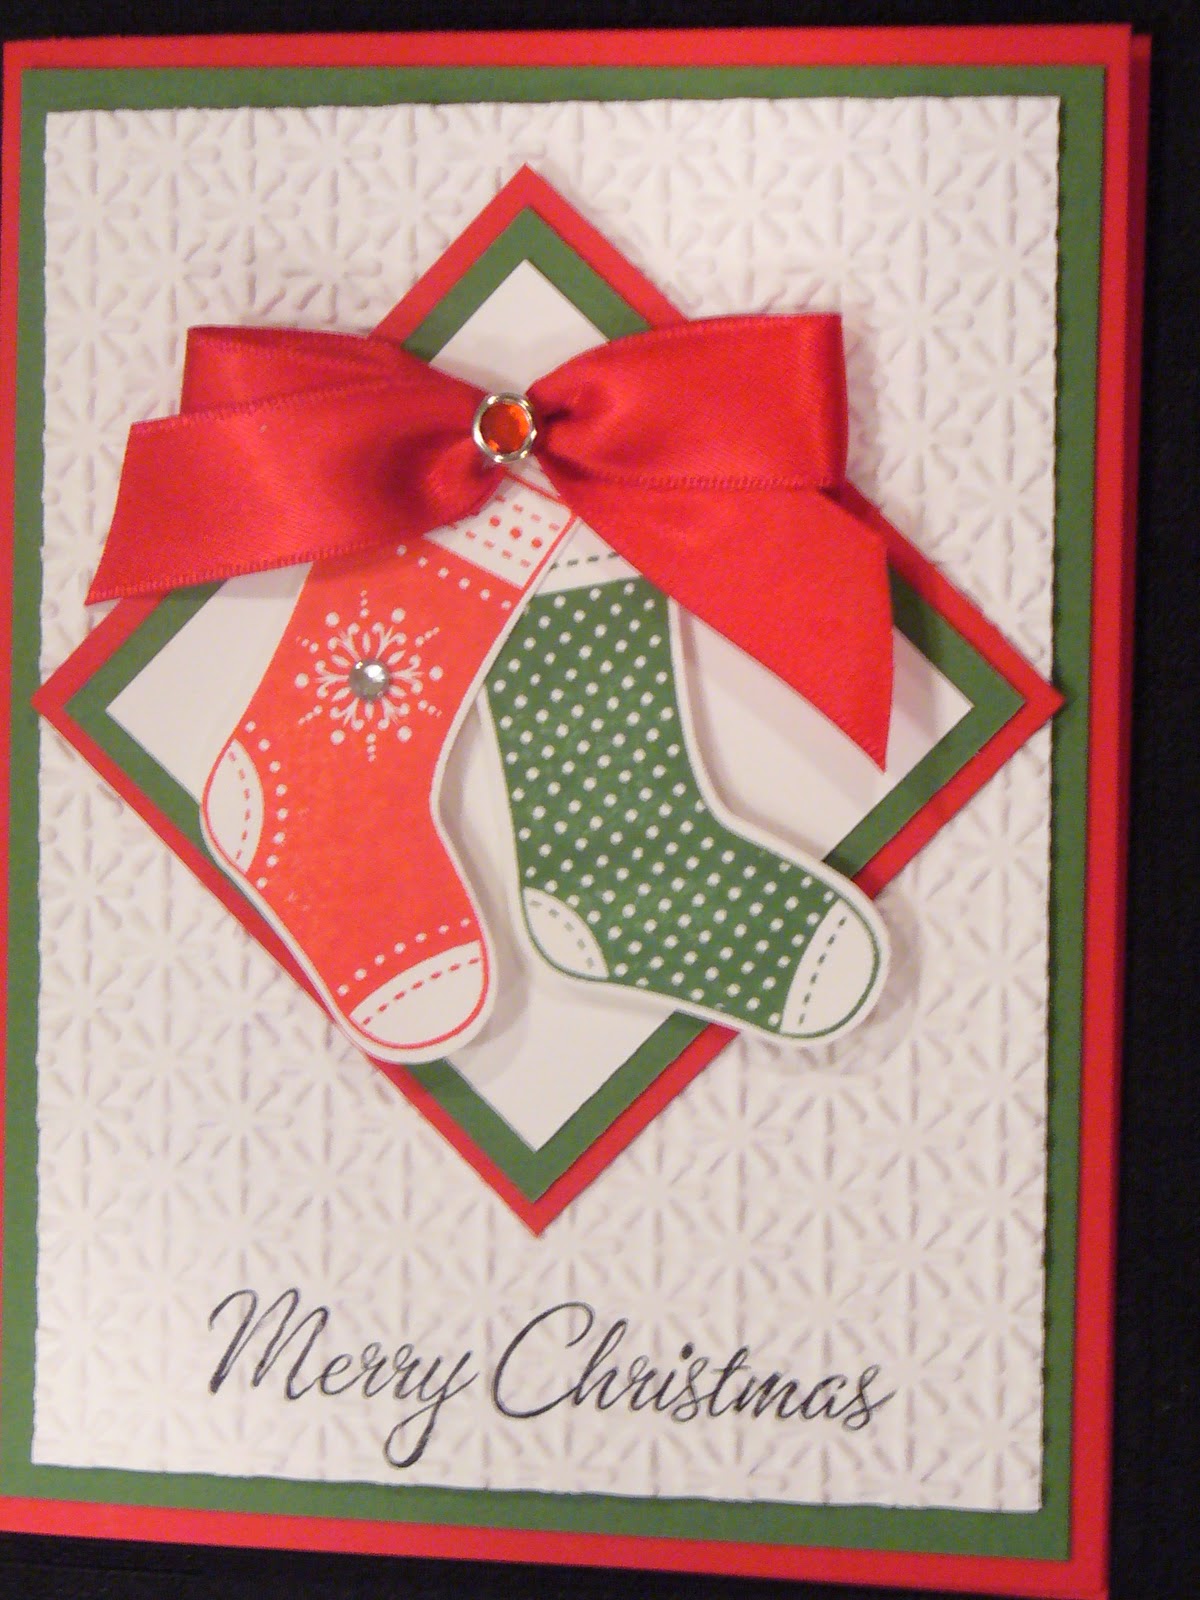
Stitched Stocking
Tuesday, November 1, 2011
Snowman Petal Cone Box


Sunday, October 30, 2011
Snowflake Christmas Bag

I love the Top Note Die and my Big Shot. I also used the new Snow Burst embossing folder. Very cool!! This is a very quick little bag to make. I actually used a small white bag as the inside, I just cut it down to about 23/4 inches tall. You could make and assemble a small white box if you would rather. I used pool party and whisper white. I also used the pool party ruffled ribbon, a blue glimmer brad (subtles), Merry Christmas from Contempo Christmas, a corner rounder, black stazon, the small oval punch, and DAZZLING DETAILS to add just a touch of sparkle to the centers of a few random snowflake centers. Like I said, quick and easy!
Reindeer Box (Stocking Die)


Thank You!
Thank you all so much for the beautiful cards and uplifting emails during the past few months. For those of you that do not know, we lost our teenage daughter in August. Then I had emergency gall bladder surgery. We also just lost our brother in law. That is why I have not been posting. I have been having classes as I am trying to get back into the swing of things. I just finished making some cute Christmas things that I will begin posting. Again, thank you for the cards and emails. Most of all, thank you for keeping us in your prayers while we were going through all of this. We are okay, and will continue to heal with God's help.
Thursday, August 4, 2011
Creative Elements Gift Card Book and Box
.jpg)
Gift cards are so popular! Here’s another pretty way to package your gift cards to make them extra special! This project is also a quick and easy club or class project as well as a great item to sell at craft fairs!
This pretty project comes to you designed by Sharon!
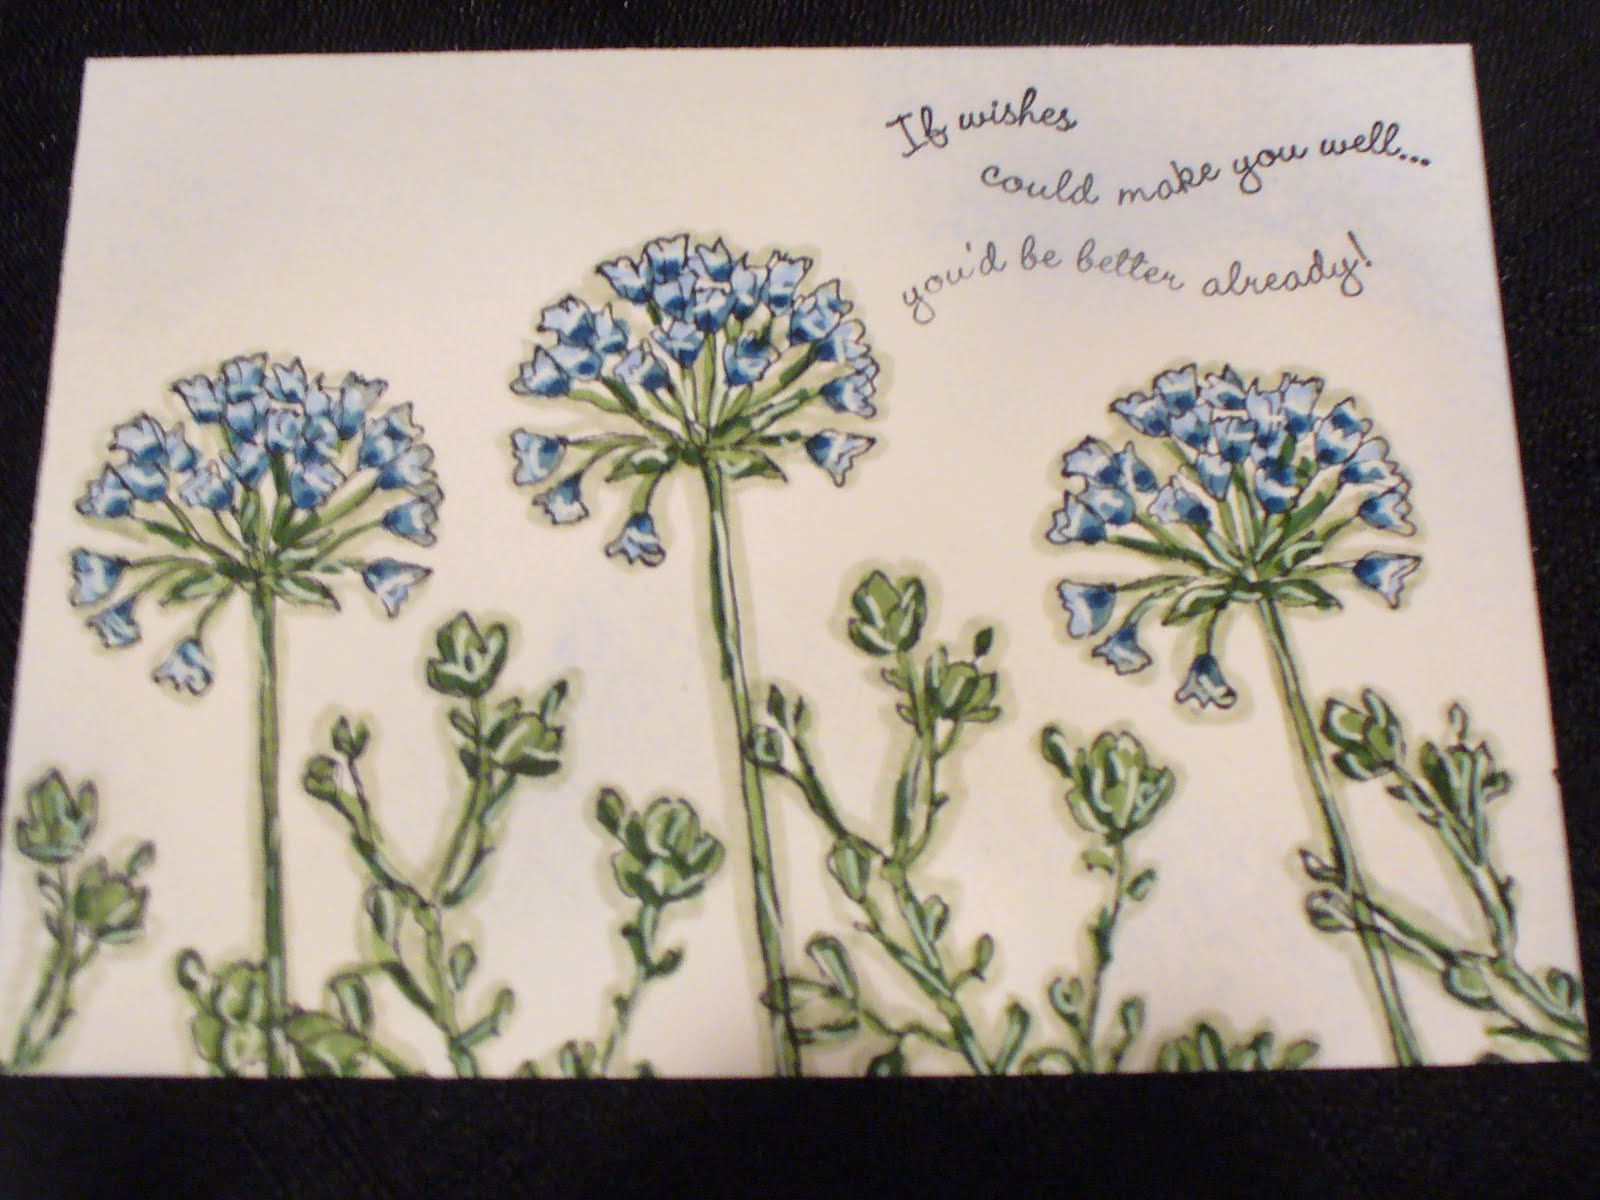
Quilled Aster Flowers and Get Well Card

It’s amazing what we can create simply by rolling up a little Designer Series Paper. Quilling is a fun technique and these Quilled Aster Flowers are a fun and simple take on rolled paper. They’re also a great way to cheer up a sick friend. Paired with the whimsical "get well" card, they’ll brighten anyone’s day and last a LOT longer than real flowers!
Craft Project Central Guest Designer

I am a Craft Project Central Guest Designer for August!!!
Craft Project Central is a great blog where you can find great ideas for 3D Stampin' Up! projects. There are 11 projects per month, and you can get tutorials for them all for only $10! I have links right here for you or you can click on the designer blinkie on the bottom left.
I am excited about being featured as a Guest Designer this month. I'll be posting the other 10 projects on my blog as they are posted as well as my own. I hope you love them all.
Now it's time for some Blog Candy!!! I'm giving away a free subscription for August to one lucky follower! There are 3 ways to enter:
1. All you have to do is become a Follower of my blog and leave me a comment letting me know you've done so. My current followers can also enter just by leaving a comment.
2. If you have a blog of your own and you post the link to my blog you'll also get an extra entry. Just let me know where you posted the link.
3. If you place an order with me during August for $50 or more, you'll get THREE extra entries!!! This can be an on line order delivered straight to you (be sure to choose me as your demonstrator), or you can let me place the order for you if you live in the Memphis area and want to stop by and see my wonderful stamping room and some of the cards/projects we have made during classes while you are picking up your order.
Fabulous Florets Gift Cards

Need a Stampin' Up! gift card? Inside these cards are stamps, ink, ribbon, paper, and so much more. You can choose the amount you want to give to a special person. I will do the rest. The front can say happy birthday, thinking of you, thank you, whatever you need. Contact me for details. I'd be happy to contact someone on your behalf and let them know YOU want a gift card.
Sets: fabulous florets, petite pairs, other
Cardstock: whisper white, pear pizzazz, melon mambo, marina mist, daffodil delight
Ink: black stazon, pear pizzazz, melon mambo, marina mist, daffodil delight
Accessories: pear pizzazz seam binding, scallop circle punch, 13/8 circle punch, slit punch (retired), dimensionals
Sunday, July 31, 2011
On the Grow

Remember to start with you lightest color, add the next color over that, then add a dot of the deepest color. For this card I found it easier to color the leaves first so I knew which ones they were. The ground is a bit of of celery and wasabi markers with sahara around it. For the water I used the white gel pen and scribbled back and forth over bashful blue where the water should be then I colored over the gel pen with bashful blue.
Sets: on the grow, sincere salutations
Cardstock: whisper white, marina mist
Ink: black stazon, marina mist
Accessories: big shot, lattice embossing folder, scallop square duo die, 21/2 circle punch, neutral brads, mat pack and poker, white ribbon, marina mist designer paper (subtles collection), sponge, dimensionals, white gel pen, markers in pink pirouette, pretty in pink, melon mambo, certainly celery, wild wasabi, bashful blue, marina mist, and saharah sand
This card is for SU Only Challenges. Come and play along!
Saturday, July 30, 2011
Raining Flowers

Sets: raining flowers, a word for you
Cardstock: melon mambo, whisper white
Ink: black stazon, melon mambo, pear pizzazz
Accessories: scallop edge punch, white brads, red sticky tape, big shot, tulip embossing folder, pear pizzazz dsp (designer series paper)
Raining Flowers

Sets: raining flowers, short and sweet
Cardstock: daffodil delight, whisper white, marina mist, melon mambo, pear pizzazz
Ink: melon mambo, marina mist, basic gray, daffodil delight
Accessories: big shot, dotted embossing folder, beautiful wings die, pearls, circle brads, little leaves die, dimensionals, scallop oval punch, medium oval punch
Friday, July 29, 2011
Suny Fun Pop Up Card


Sets: sunny fun, happiest birthday wishes
Ink: black stazon, tempting turquoise, pumpkin pie, daffodil delight
Cardstock: tempting turquoise, whisper white, melon mambo, daffodil delight, pumpkin pie
Accessories: bright brads, big shot, striped embossing folder, large scallop punch, large oval punch, scallop oval punch, circle from the big shot, markers in card colors plus pear pizazz (I think), dimensionals
Snowflake Pop Up Card


Sets: contempo christmas
Card Stock: whisper white
Ink: black craft
Accessories: black embossing powder, Big Shot, northern flurry embossing folder, rhinestones, white satin ribbon, scallop square duo die, dimensionals, swirls scribbles die, northern frost die
Wednesday, July 27, 2011
Love and Care


Sets: Love and Care, Petite Pairs
Cardstock: whisper white, pacific point, old olive,m chocolate chip
Ink: black stazon, chocolate chip
Accessories: big shot, striped embossing folder, pacific point marker, old olive marker, retired ribbon, olive striped ribbon, brights button, linen thread, glue dots, sponge
Tuesday, July 26, 2011
Simply Soft /Marker Technique


color everything in with bashful blue and wild wasabi markers

add marina mist marker on the bottom half of the flowers, add touches of garden green marker over the wasabi to highlight

add a little dot with a pacific point marker at the very bottom of the flowers

the white gel pen adds highlights on the flowers and the greenery

sahara sand marker around everything adds shadow and depth
swirls with a sponge in bashful blue then sahara sand makes things pop even more
Thursday, July 14, 2011
Every Moment

Sets: every moment, curly cute
Cardstock: crumb cake, pool party, watercolor paper (31/2x21/2)
Ink: crumb cake. pool party, old olive, chocolate chip, black stazon
Accessories: big shot, designer frames embossing folder, dotted embossing folder, vanilla taffeta ribbon, crumb cake marker, sponge, aqua painter
Pennant Parade Christmas

Merry Christmas! Just kidding, but it is time to start thinking about your Christmas cards. This one takes some time but it really is a great card. I tried stamping the tree bottoms on the circle but in the end it was easier to cut them out so I could place them exactly where I wanted them. If you want to do multiples of this card I would use the jig. Do you see the new lace punch? I cut the circles out and mounted them around the white circle just to be different. The white circle is a 3 inch circle. I used the new striped embossing folder on the bottom of the card (just taped it right over the dotted part). The trees are all on with dimensionals, so is the entire big circle area. You need to stamp Merry Christmas before you run the paper through your Big Shot. I colored the triangles with a versamark pen then embossed them with iridescent ice before I cut them out. They really sparkle. I got to use the new ruffled ribbon. Love it!!
Sets: pennant parade, christmas greetings
Cardstock: lucky limeade, melon mambo, whisper white
Ink: melon mambo, chocolate chip, black stazon
Accessories: tag punch, pennant punch, dimensionals, iridescent ice, white bakers twine, ruffled lucky limeade ribbon, big shot, 3 inch circle die, dotted embossing folder, striped embossing folder, versamark pen, lace ribbon border punch
Pennant Parade

I am finally using the new pennant punch. I love how it makes the scallop edges. I wonder how long it will be before someone comes up with a unique way to use it. Who looked at the ornament punch and saw a polar bear head???? Who ever thought of putting reinkers in shaving cream to make a background? People who think out of the box amaze me. This card was pretty straight forward. I punched the red pennants then the stamped red triangles. The triangles are mounted with dimensionals. I love the red striped bakers twine. It just adds more dimension to the card. Happy birthday is embossed with white craft ink and white embossing powder.
Sets: pennant parade, happiest birthday wishes
Cardstock: daffodil delight, real red, tempting turquoise, whisper white
Ink: white craft, real read, tempting turquoise
Accessories: bakers twine (red striped), dimensionals, white embossing powder, 1/4 and 1/2 circle punches, pennant punch, scallop edge punch, big shot, lattice embossing folder, glue dots
Wednesday, July 13, 2011
Fabulous Florets


I think this is my favorite set ever. I am so glad it is in the new catalog! This time I cut the paper at 61/2x9. I scored it at 3 and 6. To get the diagonal line I put the top right corner on the cutting line of my fiscars cutter. I put the opposite corner pointing at 41/4 then made the diagonal cut. I stamped the flower heads then the stems. Some stems are stamped off. I also stamped on the back because you can see the back when the card is folded. I colored the flowers with a dauber and real red ink. Then I used a dauber and calypso coral ink over the red. It gave it a really neat effect. I put crystal effects over the centers. The front could use a butterfly but after the butterfly class I am a little tired of cutting them. Maybe later, lol!
Sets: fabulous florets, on your birthday
Cardstock: confetti white, lucky limeade
Ink: black stazon, real red, calypso coral, lucky limeade
Accessories: dotted scallop ribbon border punch, scallop trim border punch, long open ended envelope
Tuesday, July 12, 2011
Elements of Style Vintage

I tried my hand at vintage. It was a challenge but I really do like the end results. I used very vanilla which I rarely do. I crumpled the flowers and sponged around the edges of everything in soft suede. I even sponged the ribbon to make it looked aged. The flowers, bird, and tag are on dimensionals. I punched the Thanks again and mounted it over the original stamped Thanks also with a dimensional.
Sets: Elements of Style, Perfect Punches
Cardstock: very vanilla, blushing bride, old olive, crumb cake
Ink: crumb cake, soft suede
Accessories: scallop edge punch, scallop oval punch, big shot, little leaves die, 5 petal punch, boho blossoms punch, sponge, dimensionals, metallic brads, vanilla ribbon
Monday, July 11, 2011
Touch of Kindness

Sets: touch of kindness
Cardstock: indigo island, whisper white, certainly celery, daffodil delight
Ink: black stazon, indigo island
Accessories: blender pen, triple layer flower punch, dimensionals, big shot, dotted embossing folder, little leaves die, markers in sahara sand, bashful blue, daffodil delight, certainly celery, crystal effects. circle ice brad, poker, scallop square duo
Strength and Hope

Loving those new in colors! This time I used three out of the five. If you buy this set Stampin' Up! will donated $2 to The Breast Cancer Research Foundation. This card goes with our long envelopes. You need to cut your cardstock at 61/2x61/2 and score it at 31/4. I used two layers of white. The butterfly layer is up on dimensionals. Easy!!
Sets: strength and hope. teeny tiny wishes
Cardstock: pool party, whisper white
Ink: pool party, calypso coral, wisteria wonder
Accessories: white ribbon, rhinestones, scallop oval punch, medium oval punch, dimensionals
Scallop Circle Snowman

I made this the same way the previous scallop circle was made (melon mambo, flower fest). I did have to dig up some old ribbon. I needed it to match his earmuffs. I used the paper crimper on a thin piece of black cardstock so I could scrunch and mold it around the top of his head to connect the muffs. The carrot was hand cut. I sponged around everything that isn't black. I added highlights with a white gel pen. I am just trying to beat the Memphis heat. I don't think it has ever been this bad. 109 heat index. I'm melting!!!!
Sets: none
Cardstock: whisper white, basic black, tangerine tango, bashful blue
Ink: pretty in pink, bashful blue, tangerine tango
Accessories: big shot, scallop circle, scallop oval punch, paper crimper, 1/2 and 3/4 circle punches, sponge, dauber (cheeks)blue ribbon, circle ice brad
Subscribe to:
Posts (Atom)