Wednesday, June 29, 2011

Nature Walk Butterfly Card

As usual, this is the fourth attempt at this card. My advice to new stampers is find something you like and copy it exactly. The more you try to change the longer it takes. I almost tossed the entire card! 2 hours later...

Sets: Nature Walk, Curvy Verses
Cardstock: tempting turquoise, very vanilla
Ink: black stazon, tempting turquoise, not quite navy, crumb cake
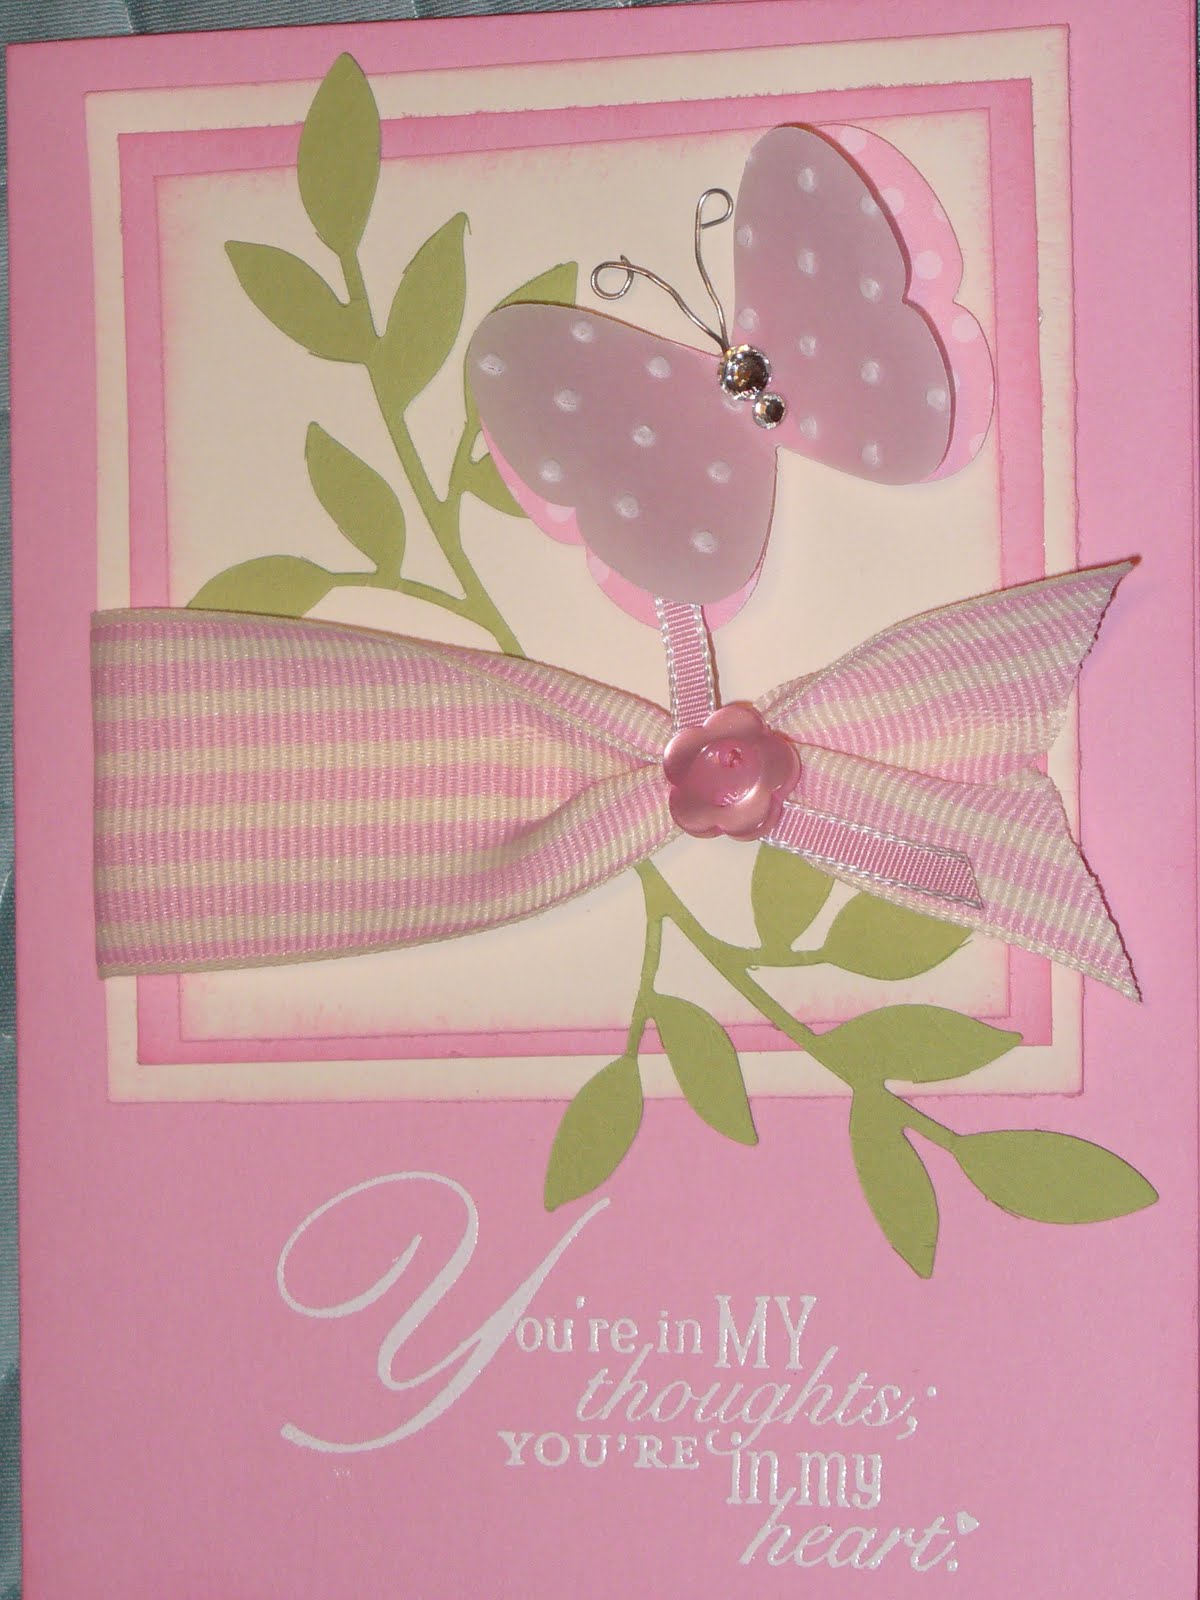
Accessories: sponge, vanilla narrow grosgrain ribbon, big shot, framed tulips and dotted embossing folders, crystal effects, markers in tempting turquoise and old olive, blender pen

I sponged around every edge in crumb cake to give it an aged look. I used a blender pen on the ink pad to color the butterfly. Then I covered the butterfly with crystal effects. I decided to leave the paper sideways after I dropped it and it landed like that. It gave the card a very interesting look. I used marker on rubber to do the flowers. After several attempts this card really did turn out beautiful. And not a drop of pink on it!

Tuesday, June 28, 2011

Love and Care

I am going for Beautiful Butterflies for my next class. I love them and it is summer so why not? Can you tell my favorite colors are pink and green? But I couldn't resist this combo when I decided to use Love and Care. This is a hostess set from the summer mini. You have until August 31st to earn it with a $300 class. If you live near Memphis you can have your class at my house. I have a wonderful stamping room. If you are out of town why not do a catalog show? Your friends can place an order with you simply by looking at the catalogs on line. I will send you a free catalog for hostessing. The first hostess to place a $300 order through me will earn this and also get Swirls and Curls which is the other hostess set in the summer mini. You will also earn $35 in hostess benefits. I have other sets to choose from  if you already have it or you are not the first person to order. Plenty for all!

For this card I stamped the main flowers using markers on rubber. The largest flower is then stamped around the edges. The smaller one is stamped off to get the shadow color. The tiny flower is full strength. I punched out the circle on the white after stamping then I used a post it note to punch the other layers. I lined the inside layer up under the circle and marked where the flower should be. I put the scallop around the outside hole then added the butterflies to cover where the stems don't quite match up.

Sets: Love and Care, Swirls and Curls
Cardstock: rose red, regal rose, whisper white
Ink: rose red, regal rose, old olive, black stazon
Accessories: pearls, olive ribbon, markers in old olive, regal rose, and rose red, small scallop circle punch, 13/8 circle punch, beautiful wings, big shot

I used the skinny end of the marker to make the box on the inside. I cut out a piece of cs the size I wanted it and drew around it. I put the butterfly over the place that I didn't go around very well. The corners where hard.


Word Play Butterfly Card

I am still on the butterfly theme. This time I used our butterfly punch. Before I punched out the vellum butterfly I ran the vellum through the Big Shot using the dotted folder. What a great effect! I sponged the edges of all the cardstock pieces with pink. It helps soften the paper. I used wire to make the butterfly antenna because it sparkles. The butterfly is mounted with dimensionals. The vellum wings are bent up.

Sets: word play
Cardstock: pretty in pink, very vanilla, certainly celery
Ink: white craft ink, pretty in pink
Accessories: clear embossing powder, Big Shot, little leaves, dotted folder, butterfly punch, vellum paper, dotted pretty in pink designer paper, pretty in pink button, sponge, rhinestones, wire, glue dots, pretty in pink wide striped and narrow taffeta ribbon, dimensionals

Word Play Wedding

I am working on another workshop. Maybe Brides and Babies or Beautiful Butterflies. Hmmm...
This card is very elegant in all whisper white and silver. The big butterfly is 3 layers. Two of the largest and one of the dotted. The wings are bent out so all three layers show. It is on a white branch form the bird punch. White on white doesn't photograph well. The saying is embossed in silver. The bow is tied with a small filigree brad.

Sets: Word Play
Cardstock: whisper white, silver
Ink: versamark
Accessories: silver embossing powder, Big Shot, beautiful wings die, vintage wallpaper embossing folder, filigree brads, rhinestones, silver cord, corner rounder, organza ribbon

Thursday, June 23, 2011

Beer Batter Bread

I just made the most wonderful bread! I took 3 cups of self rising flour, 3 TBS of sugar, and a bottle of beer. I mixed it together and put it in a greased loaf pan. I sprinkled course salt on the top and cut up some fresh rosemary over that. I baked it for 50 - 60 minutes. Wow!! I should have taken a picture. It was heavenly. I do say was. We ate the entire loaf!! Make some, you won't be sorry. Like card making- super easy and very rewarding! Bake it at 350 degrees... sorry, I left that out.

Wednesday, June 22, 2011

Fabulous Florets

This is such a FABULOUS set! I guess I know why SU named it FABULOUS FLORETS, lol! This set made it into the main catalog but you can get it right now out of the summer mini. Why wait? This time I embossed the flowers with clear powder over real red craft ink. I stamped then restamped the top of the leaves in old olive classic ink. The words come from Bring on the Cake which made it into the new catalog. Whew! I embossed the red background with the vintage wallpaper folder and my Big Shot. I added the black to the back of the red base so the red is really the base since you can't write on black. I added a small antique brad over the ribbon. Very pretty!

Stamps: Fabulous Florets, Bring on the Cake
Cardstock: basic black, real red, whisper white
Ink: real red craft, old olive classic, black stazon
Accessories: antique brads, dimensionals, big shot, vintage wallpaper folder, black wide ribbon, clear embossing powder


Sunday, June 19, 2011

Fabulous Florets

I finally had a chance to play with out new colorful embossing powder. I used the melon mambo and tangerine tango with versa mark. Wow!! I am excited these made it into the new catalog. I cut out the flowers and used a dimensional to hold them on. I stamped the leaves in old olive twice. The first time was just normal but the second time I used a piece of paper and covered most of the first stamping. I wanted the leaves to stick up higher over the tops of the flowers. There is actually a white space under the flowers. For the base I started with a piece of whisper white cut 61/2x6/12, scored at 31/4. It fits perfectly in our small open-end envelopes.

Stamps: Fabulous Florets (summer mini)
Cardstock: whisper white, melon mambo
Ink: basic black, old olive, versa mark
Accessories: small open-end envelopes, olive 5/8 grosgrain, dimensionals


Sail Away

This stamp makes me want to learn how to sail. What an easy card this was. It only takes a few minutes even though you have to cut out the sails. First, I made the setting sun by sponging so saffron over a circle template I made with the 21/2 inch circle punch. Then I sponged pumpkin pie over that until I got the desired effect. Then I stamped the boat. I used marina mist and a sponge to add the water. I stamped the boat on a white scrap and cut the sails out. They are on with dimensionals. A few layers of whisper white and marina mist along with a saying from On Your Birthday is all it takes to finish this card. The boat stamp is in the summer mini. You can order it until August 31st.

Stamps: sail away, on your birthday
Cardstock: whisper white, marina mist
ink: marina mist, black stazon, so saffron, pumpkin pie
Accessories: 21/2 circle punch, dimensionals

Thursday, June 9, 2011

Best Dad Ever


I love this set! It is in the summer mini right now. The ties are wonderful. The first time I did it all in black and white for my husband the architect. He loves black and white and grids. My mom told me to change one tie to red so I did the second card for her. Thanks, Mom! All I did was do the whole thing in black then did an extra set of ties in red, then I cut one out and taped it on top of the black. I can use the rest of the red ties on other projects. The other words to choose from in the set are THINKING OF YOU, BEST DAD EVER, AND HAPPY BIRTHDAY. You need this set if you have men in your life!

Sets: Best Dad Ever
Ink: black craft, red craft, black brads
Cardstock: basic black, basic gray, real red, whisper white
Accessories:  Big Shot and the lattice embossing folder and the dotted embossing folder, mat pack/poker, black brads, designer label punch (retiring), 1 inch circle punch, ticket corner punch

Which is your favorite? We will make one of these at the masculine class June 14th. Hmmm...

Lovely As A Tree

This is a classic set. I have made sympathy cards, Christmas cards, men's cards, women's cards, and even used one of the trees as a pine branch on a scrapbook page. I added the woody background to help make it look more manly. These two colors together are wonderful. You need to order all the wide grosgrain ribbon you can afford because it is all going. It is my favorite go to ribbon. What's a stamper to do? Buy the new ribbon, of course. And wait until you see it. New designs and new colors!


Sets: Lovely As a Tree, Woodgrain background, Sincere Salutations
Ink: chocolate chip, very vanilla
Accessories: chocolate chip wide grosgrain ribbon (retiring), sponge

This is one of the cards we are making on June 14th. We will make 6 masculine cards for $15. I hope you can come! Contact me for directions to my Memphis house.

Bring On The Cake and Seeing Stars

Bring On The Cake made it into the new catalog. Yeah!! Seeing Stars, however, got the boot. It is another great set to have around for men, kids, and graduation. You have until June 31st to order it. This card is super simple. I did have to cut out the smallest star by hand.


Sets: Bring On the Cake, Seeing Stars
Ink: night of navy, pumpkin pie
Cardstock: night of navy, pumpkin pie, and whisper white
Accessories: sponge, wide pumpkin grosgrain ribbon (retiring),  large star punch (retiring), small star punch (retired)

You can order a Big Shot die that has several size stars on it called Stars #2. Now that all of our star punches are leaving I will have to buy that. I use the star points for my punch art. I also love to layer the stars on cards and scrapbook pages.

Cheers To You

If you want to get to order this set you will need to do it before June 31. It is on the retired list. It is a great set, especially if you want a masculine card. The other stamps in the set are two great summer fruity looking drinks, a martini, and two champagne glasses clinking together. You can make this card in about 10 minutes. I really tried to not add anything that would take a long time. Part of me wants to add crystal effects to the mugs and add cut out layers of foam and pop them up with dimensionals.


Sets: Cheers To You
Cardstock: crumb cake, chocolate chip, whisper white
Ink: basic black
Accessories: Big Shot with the lattice embossing folder, hemp twine, daffodil delight marker, scallop square punch


Wednesday, June 8, 2011

Totally Tools Masculine Card

I am so glad this set is not retiring! It is hard to make a manly card. Believe it or not, the tools were quick to color and cut out. You can color out of the lines because you will be cutting them out. The tool box is pretty simple. It is a normal card size. I measured in 1 inch at the top and 21/2 inches down the side, connected the lines, and cut. I added the pocket with dimensionals after I put on the brads. Then I slipped the tools in just using tape. The set has a lot of different sayings you can add to the pocket.

Stamps: Totally Tools
Ink: black stazon
Cardstock: Chocolate Chip, Confetti Cream, Whisper White (tools)
Accessories: Big Shot and the lattice embossing folder, gold brads and the mat pack/poker, medium oval punch, dimensionals, markers in sahara sand, basic gray, real read, daffodil delight, chocolate chip, and soft suede

We will be making this card at the Maculine Class June14th at 1:00. Let me know if you can make it so I can have a precut kit ready for you. We will make 6 cards for $15.

Bird House Card


Is this cute or what? I found the pattern at Create With Dee. She has a video and the pattern. I revamped it a bit. I just embossed the cover rather than adding a whole new piece and I made the top a little wider. It really is a normal size card. Come to my stamping class on June 18th and make one yourself!

Stamps: Sincere Salutations
Ink: pacific point, cajun craze, basic black
Cardstock: confetti white, real red, whisper white, soft suede, certainly celery
Accessories: Big Shot with the lattice embossing folder, 13/4 circle punch, small scallop circle punch, triple heart punch, bird punch, black marker, daubers, dimensionals, crimper

The tricky part is to remember not to cut the left fold off. The second picture shows how I left it. The wings are on with dimensionals. If you would to order the supplies to make this card please feel free to order them from my site. If you don't have the bird punch yet you need it now! You can really do a lot with it,  not just birds.

Scrapbooking Kit Now Available!


We made these during the June Scrapbooking class. I would love to have you join us next month!
 

Fun Flowers Scrapbook Pages


Don't you love how Stampin' Up! designer paper coordinates? This paper called Delicate Dots is from a retired sale-a-bration catalog. I earned several sets so I could use it in a scrapbooking class in the future. I paired it with a new Big Shot die called Fun Flowers for this layout. It is so beautiful! My camera could not capture the rich colors.

Stamps: none
Cardstock: so saffron, whisper white, certainly celery
Accessories: Big Shot with the Fun Flowers die and the Little Leaves die, 3/4 circle punch, dimensionals, Delicate Dots dsp, scallop edge punch

I used the two smallest flowers on the die. I curled the edges up with a bone folder then used a dimensional to hold them together. I also used a dimensional to hold it on the page. The hardest part of this layout is getting everything to line up. That took some maneuvering. 

Tuesday, June 7, 2011

Rockabilly Scrapbook Pages


Life is bowl of cherries when you get to stamp all day! I created this layout for the Friday, June 10th class. I would love to see you there! Contact me for directions. I can also send you a kit if you can't make it. For $28 (includes shipping) I can mail you a precut and prestamped kit that will include all three double page 12x12 layouts for you to assemble at home. My email is jgalbra@bellsouth.net.

Stamps: none
Ink: real red, old olive
Cardstock: real red, whisper white, old olive
Accessories: Big Shot along with the dotted embossing folder and the scallop circle die and the tasteful trim die, 21/2 circle punch, rockabilly dsp, triple heart punch, boho blossoms punch, 1/4 circle punch, bird punch, dimensionals, white gel pen

I sponged around the edges of the olive scallop circle and the hearts. After I assembled the white flowers I used a the eraser end and pushed them into the palm of my hand. This makes the edges pop up.

Bugs and Kisses Scrapbook Pages


I love this set. It is on the retiring list so this is your last chance to buy it. We will be using it in our scrapbooking class Friday, June 10th at 7:00. If you live in the Memhis area I would love to have you join us! Contact me for further details about the class. $20 for three double page 12x12 layouts.

Stamps: Bugs and Kisses, Inspired By Nature
Cardstock: Very Vanilla, Pacific Point, old olive, basic black
Ink: old olive, basic black, pacific point, daffodil yellow, melon mambo, real red
Accessories: old olive narrow grosgrain ribbon, circle cutter (2 inch), 13/4 circle punch, word window, dimensionals, black marker, ice cream parlor dsp

The worm and the dragonfly are cut out. The rest of the bugs are stamped on. I had to stamp the words twice so I could cut them apart and get pretty even spacing. The bugs were inked with a pad then I used a black marker to add black to their faces, feet, etc. I stamped the dragonfly in yellow, rock and rolled it in blue, then used a black marker on his face and upper body. The magifying glass, dragonfly, and big squares are mounted with dimensionals.
  
Related Posts Plugin for WordPress, Blogger...